Introduction
Context
This blog post results from research and the implementation of various solutions for real-world scenarios to secure the runtime on AWS EKS. It aims to present different approaches to runtime security and compare these solutions, helping readers select the best option for their environment and requirements.
Let's start with defining the topic. Runtime security refers to protecting a system or an application while actively running. This involves monitoring, detecting, preventing and responding to threats in real-time, as opposed to merely securing the code during the development phase or ensuring the environment is secure before execution. Runtime security is crucial because it addresses threats that can arise during the execution of applications, including zero-day vulnerabilities, malicious insiders, and sophisticated attacks that bypass traditional security measures.
In dynamic and complex environments like those found on AWS EKS, where applications and services interact and evolve continuously, runtime security offers a crucial layer of protection that can adapt to these changes. While AWS manages the Kubernetes control plane, customers are responsible for securing Kubernetes nodes, applications, and data. As part of the shared responsibility model, it is possible to delegate more security responsibilities to AWS, by using AWS Fargate for example. However, as we will explore in this article, delegating runtime security may not be the optimal choice.
Instrumentation Techniques
Effective runtime security relies on robust instrumentation techniques to monitor and manage the behavior of applications and workloads. Understanding the instrumentation methods below allows for a tailored approach by selecting the right solutions and configurations based on the specific dynamics and requirements of environments, ensuring effective integration with existing tools and infrastructure.
The three primary techniques used for instrumentation are LD_PRELOAD, Ptrace and kernel instrumentation, each offering unique benefits and limitations.
LD_PRELOAD is an environment variable that directs the operating system to load a specified dynamic library before any other when a program is run. This technique allows for the interception and modification of function calls within the libc dynamic library.
Advantages:
- This method is generally efficient, introducing minimal overhead.
- Simple to implement and can be applied without altering the original application code.
Limitations:
- Limited accuracy with programs that bypass the libc library and make direct syscalls, such as applications written in Go.
- Primarily useful for intercepting standard library calls, but less effective for low-level system interactions.
Ptrace is a syscall that allows one process to observe and control the execution of another process. It is commonly used for debugging but can also be employed for monitoring and security purposes.
Advantages:
- Provides detailed control over the monitored process, allowing for inspection and manipulation of its state.
- Can be used for a variety of tasks, including debugging, tracing, and runtime security.
- Ptrace is a method that can be used in user-land and does not require kernel privileges. It can be used in environments like AWS Fargate where access to the host is impossible.
Limitations:
- The level of detail provided by Ptrace comes with a performance cost. Collecting more data increases overhead, potentially slowing down the system.
- To simulate a broader scope (all processes in user-land), Ptrace can attach PID 1. In case of instability (and it is very likely to bug) it will make the container crash.
Kernel instrumentation involves inserting modules or hooks into the kernel to monitor and control syscalls and other low-level operations. eBPF is an efficient method for performing kernel instrumentation.
Advantages:
- eBPF offers low overhead and high accuracy, making it suitable for real-time monitoring and security.
- Provides granular visibility into system behavior, enabling detailed analysis and response to security events.
Limitations:
- Kernel instrumentation requires elevated privileges, which may not be feasible in certain environments, such as managed cloud services.
The analysis shows that the only solution possible for managed services without root access to the host is Ptrace. However, expect global instability or use it only on specific processes, losing a lot of visibility. Whereas kernel instrumentation (especially eBPF) is the best solution for unmanaged services where you have root access to the host.
Linux Security Features
Several well-known Linux security features enhance the runtime environment. SELinux uses a configuration language to meticulously define permissible actions within user space, while seccomp and seccomp_bpf restrict syscall actions at a granular level. Implementing and maintaining these solutions is exceptionally challenging in dynamic and complex environments like AWS EKS.
The value of these security features lies in the precision of the policies and rules they enforce, effectively creating a firewall between applications and the kernel. However, poorly designed or maintained rules can adversely impact system performance and availability. Therefore, these tools are best suited for static environments, specific use cases, or as foundational elements for building more tailored security solutions as the ones we will present later in this article.
Protection vs. Detection
While these approaches are not mutually exclusive and can be combined, they have significant differences that need to be considered and discussed early on.
Monitoring and Detection
Monitoring solutions are less intrusive regarding performance and availability. They work by observing system behavior and generating alerts for any suspicious activity. However, this approach requires someone to review these alerts and take action quickly, as it is not proactive in stopping threats.
Monitoring solutions have the advantage of being application agnostic, meaning they can be implemented without requiring deep knowledge of the specific applications being monitored. Additionally, they typically require less initial setup and ongoing maintenance compared to protection solutions. Despite these benefits, monitoring solutions still require significant privileges to gather comprehensive data, allowing precise answers to "Who, What, When, and Where" questions. While monitoring can be done at the user-space level, it tends to be less accurate than kernel-level modules. User-space monitoring often adds substantial overhead, similar to protection tools, reducing its overall effectiveness.
Preventative Measures
Preventative security solutions actively block harmful actions, such as unauthorized syscalls, providing a proactive defense against potential threats. However, configuring these solutions can be challenging. Determining which syscalls to block for each process can be complex and highly dependent on the specific application and its libraries. Any updates to the application might require re-tuning of the blocked syscalls, particularly if new libraries are introduced.
This fine-tuning is crucial but can be disruptive if not managed properly. If the configuration is too restrictive, it might prevent the application from functioning correctly. Conversely, if it is too lenient, it might fail to block malicious activities effectively.
Runtime Security Strategies
While monitoring and preventative measures have distinct advantages and challenges, combining them can provide a more robust security posture. Monitoring can help identify unusual activities and provide data to refine preventative rules. Nevertheless, as of today, such solutions are not mature enough on AWS EKS for heavy workloads and real-world cases without suffering integration costs and/or significant performance issues.
Choosing between monitoring and preventative approaches, or deciding to combine them, depends on the specific requirements and constraints of your environment. In dynamic environments like AWS EKS, where workloads are constantly evolving, understanding these differences is crucial for implementing an effective runtime security strategy.
Runtime Protection
There are numerous solutions available, but I will only detail two mature solutions designed and tested against heavy workloads because they embody opposite philosophies aimed at protecting the runtime.
gVisor
gVisor is an open-source container runtime sandbox developed by Google. It enhances the security and isolation of containerized applications by acting as a user-space kernel. This approach intercepts and handles syscalls from applications running inside containers, preventing direct interaction with the host kernel. By doing so, gVisor significantly reduces the attack surface and minimizes the risk of host system compromise. Designed for compatibility with container orchestration tools like Docker and Kubernetes, gVisor integrates seamlessly into existing workflows, particularly within Google Kubernetes Engine (GKE). However, it is interesting to note that gVisor is not officially supported by AWS. It supports two platforms, ptrace_susemu and KVM.
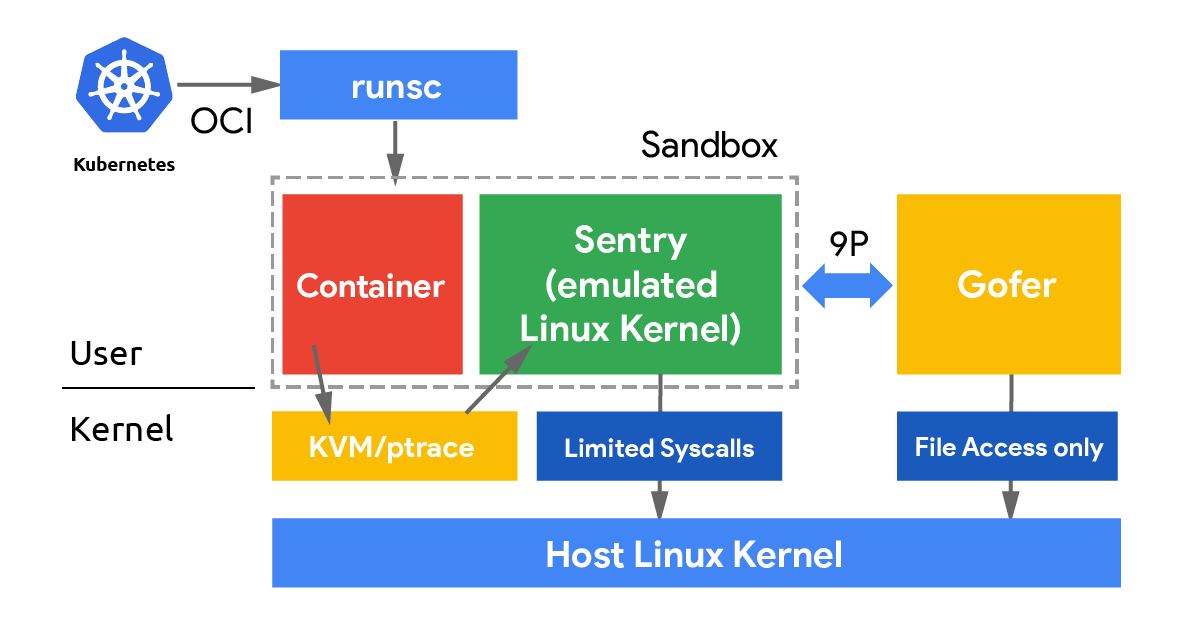
The ptrace_susemu platform leverages the Ptrace syscall to intercept and emulate syscalls made by containerized applications. Sentry is gVisor’s user-space application kernel, it intercepts these syscalls, minimizing the attack vector by preventing direct interaction with the host kernel. Sentry emulates the syscalls in a secure environment using a limited set of API calls enforced through seccomp, ensuring that only necessary syscalls are permitted. Unlike a simple Ptrace sandbox, Sentry interprets the syscalls and reflects the resulting register state back into the trace before continuing execution, maintaining application behavior while enhancing security. Additionally, the gofer component provides secure file system access, acting as an intermediary between the container and the host file system. Since it still relies on Ptrace, applications heavy on syscalls will experience performance penalties.
The KVM platform, on the other hand, uses the Kernel-based Virtual Machine (KVM) to run Sentry in a lightweight virtual machine, providing an extra layer of isolation and security through hardware virtualization features. This approach enhances isolation by leveraging hardware-level security and can optimize performance by reducing the overhead associated with syscall interception and emulation. The drawback of the KVM platform is that it requires nested virtualization or bare-metal instances.
You can find a PoC of the setup of gVisor on EKS EC2 and test by yourself here.
Fargate
Fargate is a serverless compute engine designed for running containers without the need to manage the underlying infrastructure. As part of the shared responsibility model, AWS assumes more responsibility with Fargate for securing the infrastructure, including the runtime environment of the containers.
It is important to note that by opting for Fargate, you are transferring the responsibility for runtime security to AWS. However, like any black box service, the inner workings of AWS's operations remain opaque to users. For a deeper exploration of this topic, you can refer to this great article. It explains that choosing Fargate does not inherently guarantee a secure runtime environment.
While you can still implement monitoring, relinquishing control over your containers means you lack direct access to the host, which poses several key limitations for monitoring solutions because there is no root access to the host and CAP_SYS_ADMIN (Linux kernel capability that grants a process a broad range of administrative privileges over the system) is not supported. Consequently, it is not possible to deploy kernel modules or leverage eBPF for tracing syscalls. File system monitoring and network activities lose visibility and accuracy. And sidecar architectures become not compatible with monitoring solutions.
These factors underscore the trade-offs associated with using Fargate: while it delegates the responsability, it also imposes restrictions on advanced monitoring and security practices. As a side note, Fargate is supported by GuardDuty Runtime Monitoring (presented later in this article), but only on ECS and not EKS.
Runtime Monitoring
Falco
Falco leverages a kernel module and eBPF modern probe to collect syscall events from the underlying host kernel. This allows Falco to observe low-level system activities such as file access, network communication, and process creation.
In a Kubernetes cluster, Falco is deployed as a DaemonSet. This means there is an instance of the Falco agent running on each node within the cluster. These agents continuously collect and analyze syscall events from their respective nodes.
Collected syscall events are processed by the Falco event processor. The processor applies rules to detect suspicious or unauthorized activities. When a rule is triggered, an alert is generated.
Falco provides various alerting options, such as sending alerts to syslog, writing to a file, or integrating with external alerting and monitoring tools like CloudWatch.
In addition to runtime events, Falco relies on audit logs (Kubernetes API server and control plane logs) to enhance its contextual awareness. It can access information about pods, containers, and their relationships, which is valuable for understanding the runtime environment.
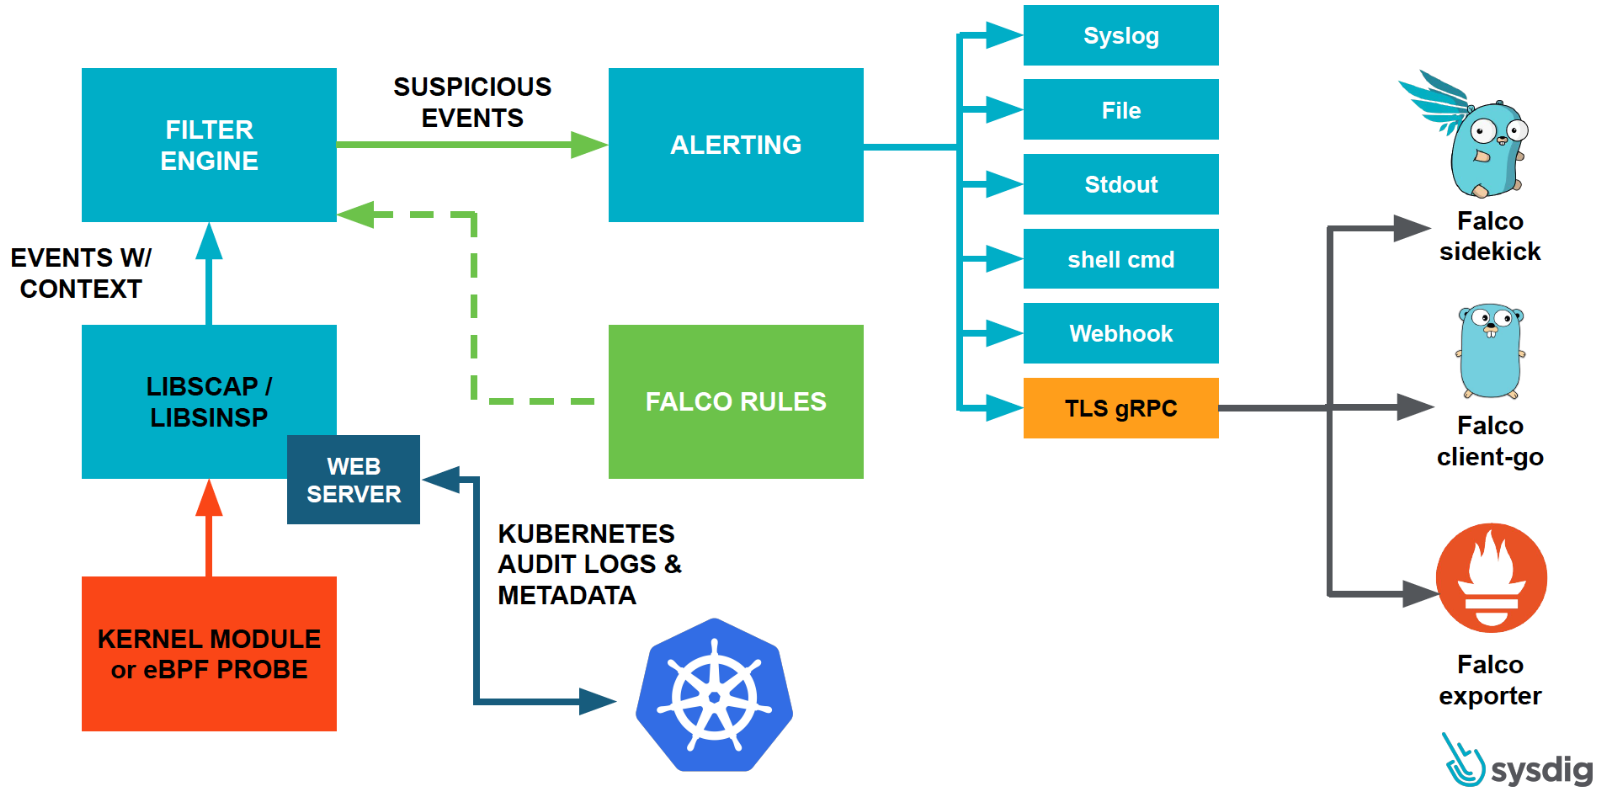
Falco stands out with its exceptional customization capabilities. It allows security engineers to tailor detection rules based on specific syscalls, container events, and network activities. This granularity minimizes false positives and enhances the accuracy of threat detection. Following the same logic it is also possible to customize the output of the alerts thanks to the rule engine. Falco uses a custom rule language in YAML format, below is a custom rule to detect a reverse shell inside a pod.
- rule: Reverse shell
  desc: Detect reverse shell established remote connection
  condition: evt.type=dup and container and fd.num in (0, 1, 2) and fd.type in ("ipv4", "ipv6")
  output: Reverse shell connection (user=%user.name %container.info process=%proc.name parent=%proc.pname cmdline=%proc.cmdline terminal=%proc.tt)
  priority: WARNING
  tags: [container, shell, mitre_execution]
  append: false
You can find more details about this rule here.
As for gVisor, here is the PoC to install and test Falco on EKS EC2 with Fluent Bit and CloudWatch.
GuardDuty EKS runtime Protection
Similar to Falco, GuardDuty EKS runtime protection relies on an agent. This agent, known as the AWS EKS integration agent, is deployed as a DaemonSet in the EKS cluster. It runs on each node and is responsible for monitoring and collecting data. The agent collects data related to network traffic, DNS requests, and other activities within the EKS cluster. This data is sent to GuardDuty for analysis.
GuardDuty employs machine learning and threat intelligence to analyze the collected data. It looks for patterns and anomalies that may indicate security threats or malicious activities.
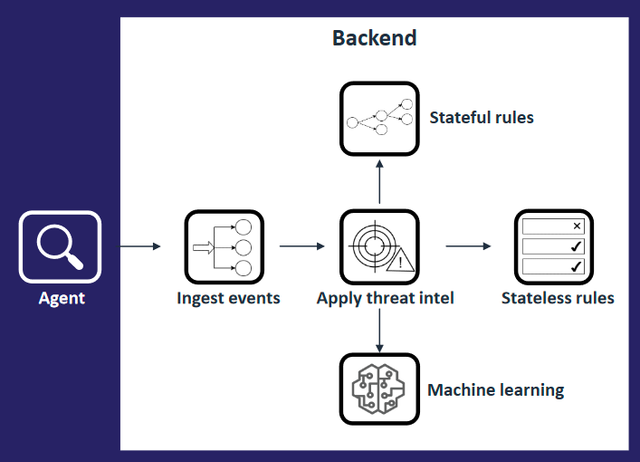
GuardDuty integrates with other AWS services, such as CloudTrail and VPC Flow Logs, to gain a comprehensive view of activity across the AWS environment, including the EKS cluster.

When GuardDuty detects suspicious or malicious behavior, it generates alerts. These alerts can be configured to trigger notifications via AWS services like Amazon SNS (Simple Notification Service) or sent to AWS CloudWatch for further analysis and action. These findings can be integrated with AWS SecurityHub, which acts as a central repository for security-related information. SecurityHub can be configured to trigger a CloudWatch Event or EventBridge event when a new finding is created. Upon the event trigger, a Lambda function can be invoked to send a notification to a designated Slack channel, for example.
Falco vs. GuardDuty
To determine the optimal solution, we will employ the following criteria:
1) Threat Detection: Evaluate the effectiveness of each solution in accurately detecting security threats, minimizing false positives, and identifying actual security incidents.
2) Customization: Assess the level of customization each solution offers, particularly in defining security policies and rules tailored to our environment.
3) Performance: Analyze the impact of each solution to ensure it does not adversely affect services performances.
4) Operational Overhead: Evaluate the operational overhead, including deployment, configuration, and ongoing management of each solution.
I will not be covering pricing as a critera in this article because the results of the cost analysis were inconclusive and uncertain. Although Falco and GuardDuty runtime protection utilize identical architectures, the volume of events processed impacts the cost.
Dependencies
In terms of dependencies, to run Falco in the least privileged mode with the eBPF driver, the requirements vary based on the kernel version. On kernels below 5.8, Falco requires CAP_SYS_ADMIN, CAP_SYS_RESOURCE, and CAP_SYS_PTRACE. For kernels version 5.8 and above, the required capabilities are CAP_BPF, CAP_PERFMON, CAP_SYS_RESOURCE, and CAP_SYS_PTRACE, as CAP_BPF and CAP_PERFMON were separated from CAP_SYS_ADMIN. For GuardDuty EKS runtime monitoring, the prerequisites are outlined in the Amazon GuardDuty documentation.
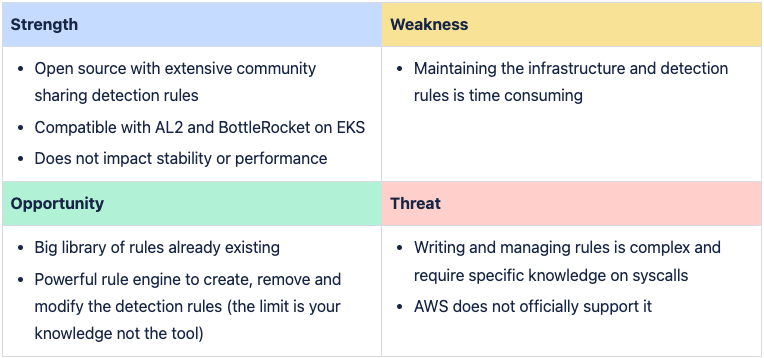
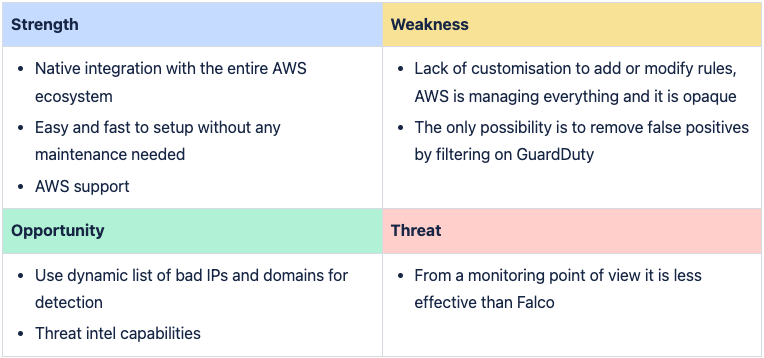
SWOT Tables
Compraison Criteria
1) Threat Detection
Both Falco and EKS Runtime Protection utilize eBPF probes, ensuring comparable accuracy in threat detection. Falco offers a significant advantage with its high degree of customization, allowing for fine-tuning and tailoring detection rules to specific needs. On the other hand, GuardDuty ingests logs from various AWS sources, providing a better context for the investigation.
In both cases, you will have to deal with a significant number of false positives, especially in an EKS environment. For GuardDuty, this issue is particularly evident with findings such as New Binary Executed and New Library Executed. For Falco, the rule for tampered logs (fluentd) outlines similar challenges. While it is easier to filter GuardDuty alerts, some filtering parameters may be missing, leading to an inability to filter or overly restrictive filtering that might miss important cases.
The machine learning module in GuardDuty is effective for detecting anomalous behaviors within EKS clusters, such as container compromises from the internet or developer account compromises. It can also detect internal abuses, like developers executing commands in production containers or the misuse of an incident-specific role in AWS for unintended purposes. Additionally, the threat intelligence module relies on third-party providers such as Proofpoint and CrowdStrike, offering a reliable source of intelligence with no observed false positives.
Overall, Falco offers more possibilities and benefits from a larger native library of detection rules compared to GuardDuty runtime and audit logs findings.
2) Customization
Falco excels in customization, offering extensive capabilities to customize the output of the alerts and define security rules tailored specifically to the environment or specific CVE like this example with log4j (CVE-2021-44228). This flexibility is crucial for adapting to evolving security threats and aligning with unique requirements. Whereas, customization is nonexistent on GuardDuty.
3) Performance
EKS Runtime Protection benefits from AWS's scalability and performance optimizations for EKS clusters. It is less likely to adversely affect service performance, especially at scale. That said, no performance impact has been observed on services where Falco has been deployed in production environments with heavy workloads.
4) Operational Overhead
As a managed service, EKS Runtime Protection significantly reduces operational overhead. It integrates seamlessly with EKS clusters. It is designed to work harmoniously with AWS services, ensuring straightforward setup, maintenance and operational use. In contrast, Falco requires more effort in deployment, configuration, maintenance and operational use, making EKS Runtime Protection a more convenient option for reducing administrative burdens.
Conclusion
There is no one-size-fits-all solution. The best choice depends on the specific requirements, environment and team capacity. Understanding the nuances of runtime security and the strengths of each solution allows for informed decision-making to enhance overall security posture.
Future directions involve further exploration of monitoring solutions integrating prevention capabilities as they evolve such as Tetragon, and the integration of distinct monitoring and preventive solutions. An example of this is Falco with gVisor on GKE (Google), leveraging the strengths of both tools to provide robust runtime security in containerized environments where gVisor sandbox is used as a source for creating and fine-tuning detection rules.


